What is a channel (trench/line/slot) drain?
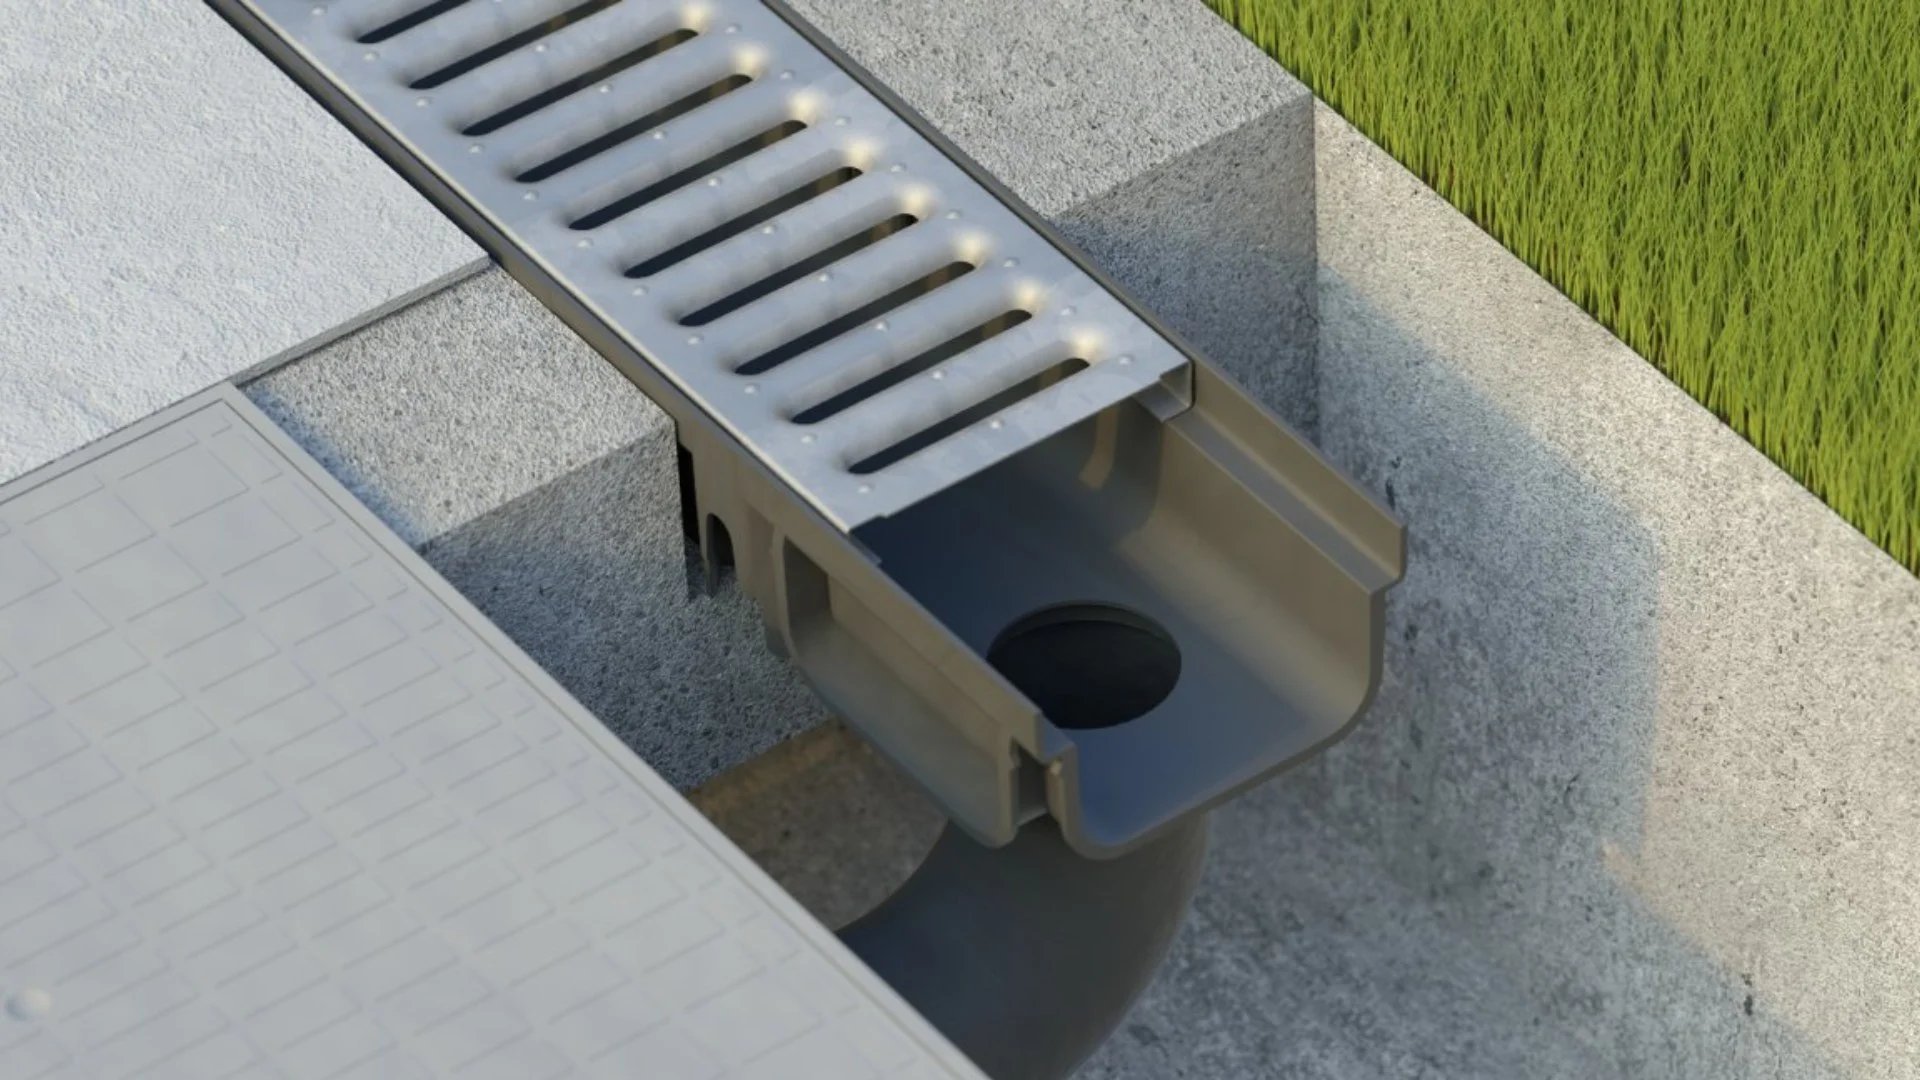
A channel drain, also referred to as a trench drain, line drain, slot drain, or drainage channel, is an engineered linear drainage system designed to efficiently collect and direct surface water away from high-risk areas. These drains are manufactured from robust materials such as high-density polyethylene (HDPE), polypropylene (PP), concrete, or even galvanised steel, each selected according to the load requirements and chemical exposure typical of the project’s environment.
Channel drains are most commonly deployed in locations such as driveways, patios, car parks, loading bays, and around pool surrounds, anywhere surface water runoff could threaten structural integrity or interrupt safe, regular use. They are particularly valued in projects where rapid rainwater dispersal is critical, for instance, beneath downpipes, across commercial entrances, or bordering hard landscaping.
Correct installation is not merely recommended, but essential: a poorly installed channel drain, or one constructed with unsuitable materials, can lead to water sitting on the surface, accelerating wear, triggering freeze-thaw cycles, and promoting erosion or subsidence.
This in turn causes structural problems, from movement in paving to actual property damage and regulatory failures. Furthermore, improper drainage exposes the wider site to waterlogged soils, which can undermine foundations and create hazardous slip conditions.
By exceeding the standards outlined in EN 1433 and matching the channel’s material and design to the specific traffic and usage profile of your project, channel drains provide a controlled, maintainable solution. This solves the persistent challenge of surface water management in the built environment.
A precise and durable channel drain installation begins with using the right tools and high-quality components, each suited to the load and exposure of the application. Before starting, ensure the following items are on hand:
-
Channel drain sections: often supplied in one-metre or half-metre lengths, made from polypropylene, HDPE, concrete, or metal, with or without built-in fall.
-
Grates or covers: choose the loading class (A15 to F900, per EN 1433) based on the anticipated traffic—pedestrian, light vehicle, or heavy commercial. Clip-in or bolt-down options should be considered according to security and accessibility needs.
-
End-caps and outlets: end caps seal the uppermost section, while dedicated outlets connect the drain run to larger surface water or combined drainage pipes.
-
Sealing compound or silicone sealant: important for watertightness at joints and end-caps, ensuring the system remains leak-proof over time.
-
String line: allows you to maintain a consistent finished height, setting the grate 2mm below the surrounding surface for optimal operation.
-
Concrete or bedding mortar: required for both structural support and ensuring a secure bond around the drainage channel, especially in trafficked areas.
-
Pipe connectors and adaptors: facilitate a reliable connection to underground pipework, soakaways, or inspection chambers.
-
Heavy duty masking tape or equivalent: used to protect gratings during concrete pouring and prevent damage or contamination.
-
Basic hand tools: including tape measure, spirit level, spade or trenching tool, saw for channel length adjustment (if needed), and sealant applicator.
Preparation and attention to specification is everything—ensure all elements are compatible in load class and system dimensions before beginning, as post-installation corrections are often challenging and costly.
The 11 steps needed to complete a channel drain installation:
A successful channel drain installation relies on precise planning, accurate execution, and ongoing care. Follow these grouped steps to achieve an efficient, durable drainage system that meets professional standards.
Prepare the Trench
-
Excavate the trench: begin by digging a trench for your channel drain. As a minimum, ensure the trench is at least 50mm deeper and 100mm wider than the external dimensions of the channel unit. Adapt depth and width depending on application: light-duty domestic channels require less space, whereas systems for commercial yards or airports demand substantially larger dimensions for both drainage capacity and structural bearing.
-
Set the string line: fix a taut string line at the finished height of the channel grating, ensuring this level is approximately 2mm below the adjacent surface. This fine adjustment prevents water ponding and ensures a neat, safe transition between the channel and the surrounding area.
-
Establish the slope (1:200): to promote self-cleansing flows and prevent debris settlement, maintain a continuous fall of 5mm per metre (1:200 ratio) along the trench. Use the string line and a spirit level during excavation to guarantee the correct gradient from start to finish.
Positioning & Connecting Sections
-
Start at the lowest point: initiate installation from the drainage outlet or lowest point in the run. Any sections that require cutting should be installed at the furthest, highest point to retain water-tightness.
-
Interconnect channel sections: insert each channel section, connecting them securely through manufacturer-designed slots or clips at each end. This guarantees alignment and extends structural integrity across the run.
-
Fit grates during installation: keep grates in situ while positioning sections. This ensures accurate height and alignment across the entire system, eliminating the need for later adjustments.
-
Install end caps and seal joints: at the terminal, highest end, fit a dedicated end cap. Apply a quality silicone sealant to all joints and the end cap to reinforce watertightness, improve resistance to settlement, and extend system durability.
Backfill & Finishing
-
Connect to underground drainage: securely attach the completed channel run to the underground drainage system using appropriate connectors or adaptors. Confirm a free-flowing, unobstructed path for all collected surface or foul water to disperse as designed.
-
Protect grates before pouring concrete: cover the installed channel grates with heavy-duty masking tape or suitable protection. This shield preserves the finish and prevents ingress of concrete or debris during the subsequent pour.
-
Pour and finish concrete surround: encase the channel in concrete, ensuring the finished surface stands approximately 2mm higher than the channel grate. This detail channels excess water directly into the system and protects the edge from chipping or spalling. Check alignment and slope throughout the pour.
-
Allow full curing before use: let the concrete cure undisturbed for at least 72 hours. Avoid loading the area or walking on the installation during this period to prevent displacement or damage to both the concrete and the drainage system.
Maintenance
- Periodic cleaning and inspection: establish a schedule for routine cleaning and inspection, especially after periods of heavy rainfall. Remove grates, clear out any debris or sediment, and check for signs of joint movement or surface settlement. Consistent maintenance preserves hydraulic performance and prolongs the life of the installation.
Despite its impactful role in caring for the land around it, people often overlook and underestimate surface water drainage. Failure of drainage systems is a common occurrence. Why do some surface water drainage systems fail?
Occasionally, minor installation errors affect the overall effectiveness of the drainage system. The results can cause stagnant water buildup, water seepage, and eventual flooding. While this can cause significant damage to a building, it can also negatively impact the natural environment surrounding it.
The Three Most Prominent Mistakes During Channel Drain Installation
Poor Planning & Slope Errors
One of the most common pitfalls in channel drain installation is inadequate planning, especially when it comes to trench sizing and site assessment. Failing to observe recommended trench dimensions, or not understanding the underlying substrate, can compromise both hydraulic performance and system stability.
For example, a trench that is too narrow or shallow restricts the required bedding material, leaving the channel susceptible to movement or collapse under load. Ignoring site levels and not establishing a consistent fall—at least 1:200—is another frequent error. Inadequate slope slows water movement, increasing the likelihood of debris accumulation and blockages, while excessive slope may cause scouring around the channel.
An accurate assessment of ground conditions, careful planning of falls, and adherence to manufacturer’s trench specifications are critical. Consulting with skilled installers or civil engineers before starting work mitigates these risks and ensures a robust, durable system tailored to your project's requirements.
Wrong Material or Load Rating
Selecting inappropriate materials or load classifications leads directly to premature system failure. It’s essential to match the channel drain material and grating to the predicted traffic load and application environment. For example, using lightweight plastic channels in areas subjected to frequent vehicle traffic (or where heavy loading and impacts are expected) can result in cracking, deformation, and collapse.
The European standard EN 1433 provides clear guidance with load classes, ranging from A15 (pedestrian areas) to F900 (industrial and airport zones). Reference the manufacturer’s load rating table to select the right type: concrete and ductile iron channels provide strength for high-load areas, while plastic may suffice for landscaped or lightly trafficked locations.
Environmental considerations, such as freeze-thaw cycles, chemicals, and UV exposure, should also influence your material choice. Making the right selection up-front is a strategic investment in both durability and ongoing safety.
Improper Flow Rate Calculation
A third—and critical—mistake is failing to accurately calculate the required flow rate for the drainage system. Underestimating the volume of water generated during heavy rainfall or disregarding the total catchment area results in channels and pipes that are simply too small.
This oversight leads to rapid blockages, reduced drainage efficiency, and, ultimately, surface or structural flooding. Water backing up due to undersized channels can seep into building foundations and walls, causing deterioration and damage over time.
Always perform detailed hydraulic calculations, using the formula Q = C × I × A (where C is the runoff coefficient, I is rainfall intensity, and A is the area), and compare the results to channel capacity data supplied by reputable manufacturers.
Taking the time to size the system correctly from the outset prevents costly remedial work and ensures the longevity of both the drainage system and surrounding infrastructure.
Tips, dos and don’ts
Proper installation of channel drains demands methodical attention to every stage, from initial layout to final commissioning. Following proven tips and learning from common mistakes guarantees durable, high-performance drainage.
DO always begin laying sections at the lowest point of your run and work towards the highest. This approach simplifies achieving the correct gradient and facilitates future maintenance. Check that the string line for grating height is set 2mm below the intended finished surface to prevent trip hazards and unsightly gaps.
DO maintain a fall of at least 5mm per metre (1:200 ratio) across the run. This ensures self-cleansing velocity, reduces standing water and lowers risk of debris accumulation. Fix all channel sections together with the gratings in place—this method secures alignment and simplifies level checks.
DO connect channels to a legally compliant soakaway, inspection chamber, or approved stormwater system. Failure to do so, or discharging onto neighbouring land, not only breaches planning rules but exposes you to liability for property damage.
DO check and observe the appropriate load class (EN 1433) before finalising product choice. Channel drains subjected to traffic above their design class can deform or fail prematurely, causing safety risks and costly rectification.
DON’T exceed maximum flow rates for the selected channel section. Ignoring manufacturer guidelines inevitably leads to surface flooding and undermines the system’s hydraulic integrity.
DON’T pour concrete around the channel until all joints, connections, and end caps are properly sealed with a suitable silicon sealant. Skipping this step leads to water ingress, freeze-thaw cracking, or gradual channel displacement over time.
Legal Note: Always review local authority and building regulations before starting works. Many jurisdictions require planning permission for new surface water connections or modifications to drainage outlets. Non-compliance can result in enforced remediation and penalties.
Structured adherence to these professional practices in every installation phase reduces long-term maintenance and ensures that drainage systems fulfil both engineering standards and client expectations.
Troubleshooting and maintenance
Efficient channel drain systems are only as reliable as their maintenance routines allow. Even perfectly installed drains will be compromised if routine inspections and cleaning are neglected.
After any significant rainfall or storm event, inspect the visible runs for evidence of blockages, pooled water, or sediment build-up. Remove grates using approved lifting keys—this permits rapid visual assessment of the channel interior. Use a hose or low-pressure washer to dislodge debris and check for smooth water flow towards the outlet.
Channels equipped with sediment traps or silt buckets should be emptied manually at least once every 6–12 months, or more frequently in high-debris environments such as car parks or industrial yards. These traps prevent sand, leaves and litter from entering the main drainage system where blockages are exponentially harder to clear.
Check that all gratings remain firmly seated and undamaged. Loose, corroded, or broken grates present not only a functional hazard but a safety risk for pedestrians and vehicles. Replace them immediately with compatible components meeting the original load class.
Inspect all joints and end caps for signs of leakage or subsidence. Where movement or cracking is detected, reseal with a high-quality, compatible sealant. For channels crossing areas of heavy vehicle traffic, include monitoring for channel settlement or shifting, as early rectification prevents pavement or concrete failure.
Reference authoritative guidance such as the Tahoe BMP Manual for thorough step-by-step maintenance procedures. Integrating such practices into your regular site management minimises downtime, preserves hydraulic capacity, and ensures system longevity. Proactive maintenance ultimately lowers total life costs and upholds your professional reputation.
FAQ